---
title: Color Swatch Options
description: Color swatches can help your customers make easier choices about what color they prefer.
---
[Skip to content](https://help.volusion.com/s/colorswatchoptions#main-content)
English - United States
Show submenu for translations

Open main navigation
Close main navigation
- English - United States
Show submenu for translations
- [Contact Us](https://volusion.com/contact)
[Contact Us](https://volusion.com/contact)
Search the Help Center
- There are no suggestions because the search field is empty.
1. [Volusion Help Center](https://help.volusion.com/s?hsLang=en-us)
2. [V1](https://help.volusion.com/s/v1?hsLang=en-us)
# Color Swatch Options
Color Swatch Options
Color swatches can help your customers make easier choices about what color they prefer.
Even though your customers can't touch or try on products in your store, you can give them a more realistic idea of what a specific product will look like with color swatches. If you sell products that come in color variants, the color swatch function lets you configure them so that customers can click on a color swatch, as shown below, and preview the product in the specified color.
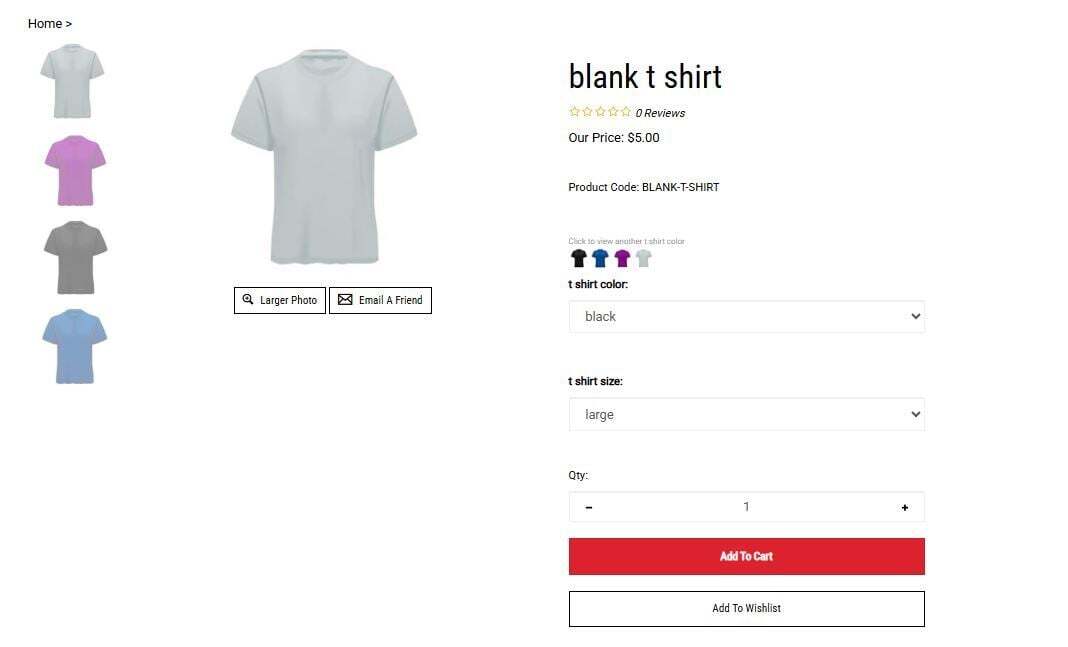
You can use the Color Swatch option with or without the Inventory Control Grid.
Using it with Inventory Control lets you quickly create child products for the variants of a product. For example, if a shirt with the product code MD01 is available in three different colors, child products with the default codes of MD01-0001, MD01-0002, and MD01-0003 are created. Although this adds more products to your database, it gives you greater control over variants, particularly if you want to include size and other options.
If you prefer to create one product in different colors as opposed to creating child products, you can set it up without using inventory control.
If you aren't familiar with setting up products, inventory control, and product options, please see "[Adding Products To Your Store in 3 Simple Steps](https://help.volusion.com/s/AllProductsSettings?hsLang=en-us)" and "[Customizing Your Product Options](https://help.volusion.com/s/AddingOptionstoProducts?hsLang=en-us)" before continuing.
Using the Color Swatch Option With Inventory Control
1. If you haven't already, start by creating product images and corresponding swatch images. The product images should all be the same size to avoid distortion.
2. In the **Image Management** section, create the product as normal, uploading the image you want to display as default for this product. In the same upload window, click **Advanced Settings** and deselect **Enable Alternate View Photo**. If you make any changes in **Advanced Settings** to the **High Resolution Zoom Image (large)** and **Displayed on Product Page (medium)** settings, you'll need to duplicate them in the **Option Color Swatch** table in step 7 below.
3. Create the **Product Options** for the colors you need (or use existing options if you have already created a set of generic color options). You can use **Dropdown**, **Radio**, or **Dropdown\_Smartmatch** for **Display Type** in the **Option Category**. (The other options do not produce useable results.)
4. In the **Basic Info** section, click **Add Options** and select the colors you want to assign to the product.
5. Click **Save**. **Enable Options Inventory Control** will be enabled.
6. Click **Save** at the bottom of the page.
For more information about setting up options, see "[Customizing Your Product Options](https://help.volusion.com/s/AddingOptionstoProducts?hsLang=en-us)".
The **Inventory Control Grid** should now display the color variants with unique product codes. If you've created other products options, such as size, variants for each combination of colors and size will be created. You can edit these codes here, if you have pre-assigned codes for these variants.
You can also change the price of any of the variants here (for example, if you have a sale on a particular color), although if you do so you will need to mention this in the **Product Description** as the altered price is only displayed in the shopping cart and subsequent screens.
7\. At the bottom of the product page, you'll now see the **Option Color Swatch** section listing all the color options you've enabled for this product - this is where you load the swatches and corresponding images.
8\. Click **Add** for each color option to open browse boxes in the **Swatch Image** and **Medium & Large Images** columns for each option.
9\. Click **Browse** beside each field, find the image on your local computer, and click **Upload**.
10\. Click **View Live Page** to see the live product page showing the swatches and drop-down list or radio buttons with the color names.
If a product has other product options (for example, size), they will appear in the **Option Color Swatch** table as well, but have no bearing on creating the color swatch table.
Note that the default image loaded for the product is shown in the shopping cart rather than that for the option selected, but the description will be correct.
Using the Color Swatch Option Without Inventory Control
1. Before you begin, make sure you have the product images and the corresponding swatch images. The product images should all be the same size to avoid distortion.
2. In the **Image Management** section, create the product as normal, uploading the image you want to display as default for this product. In the same upload window, click **Advanced Settings** and deselect **Enable Alternate View Photo**. If you make any changes in **Advanced Settings** to the **High Resolution Zoom Image (large)** and **Displayed on Product Page (medium)** settings, you'll need to duplicate them in the **Option Color Swatch** table in step 6 below.
3. Create the product options for the colors you need (or use existing options if you've already created a set of generic color options), making sure you include the product code in their **Apply to Product Code(s)** box. You can use **Dropdown** or **Radio** for **Display Type** in the **Option Category**. (The other options do not produce useable results.)
4. Go back to the **Product** page and Scroll down to the **Product Options** section. Add the color options in **Options.**
5. Make sure **Enable Inventory Control** is deselected. Click **Save**.
6. Near the bottom of the **Product** page, you'll see the **Option Color Swatch** listing all the color options enabled for this product - this is where you load the swatches and corresponding images.
7. For each color option click **Add** to open browse boxes in the **Swatch Image** and **Medium & Large Images** columns for each option.
8. Click **Browse** beside each field, find the image on your local computer, and click **Upload**.
9. Click **View Live Page** to see the live product page showing the swatches and drop-down list or radio buttons with the color names.
Note that the default image loaded for the product is shown in the shopping cart rather than that for the option selected. If, however, the customer clicks on the Options link, a pop-up window appears confirming the option details.
**Swatch Images in Your Store's FTP**
If you need to reference any of your swatch images externally, they can be found and referenced with http://www.myvolusionstore.com/v/vspfiles/photos/options (replace "myvolusionstore" with your store domain). If you go into the /vspfiles/photos/options folder in your FTP, you will find all of your swatch and medium images with the naming conventions in the table below.
**Photo Name Extension**: -S
**Photo Name**: Swatch
**Product Page Display Location**: directly above the product options list under the corresponding option category
**Full File Name**: \[productcode\]- / \[optionid\]- / S.\[fileextension\]\*
**Photo Name Extension**: -T
**Photo Name**: Medium
**Product Page Display Location**: in the main photo location when a visitor clicks the corresponding swatch image
**Full File Name**: \[productcode\]- / \[optionid\]- / T.\[fileextension\]\*
\*\[productcode\] is the product code of the product where you uploaded the images.
\[optionid\] is the numeric identifier of the product option for the image.
\[fileextension\] is the file type, which should be jpg for JPEG files.
### Same Photos As ProductCode
If the product uses the **Use Same Photos As ProductCode** field, then both the product images and the Option Color Swatch images have to be applied to the product code put in that field, rather than the primary product.
- [Getting started](https://help.volusion.com/s/getting-started?hsLang=en-us)
- [Manage Your Store](https://help.volusion.com/s/manage-your-store?hsLang=en-us)
- [Marketing for Success](https://help.volusion.com/s/marketing-for-success?hsLang=en-us)
- [Volusion Payment Powered by Stripe](https://help.volusion.com/s/volusion-payment-powered-by-stripe?hsLang=en-us)
- [Partner Marketplace](https://help.volusion.com/s/partner-marketplace?hsLang=en-us)
- [Support](https://help.volusion.com/s/support?hsLang=en-us)
- [V1](https://help.volusion.com/s/v1?hsLang=en-us)
- [Security](https://help.volusion.com/s/security?hsLang=en-us)
[](https://volusion.com/)
[mailto:email@email.com](mailto:email@email.com)
Copyright © 2026, Volusion